Learn to Make NES Games
“Hello, World!” Part One
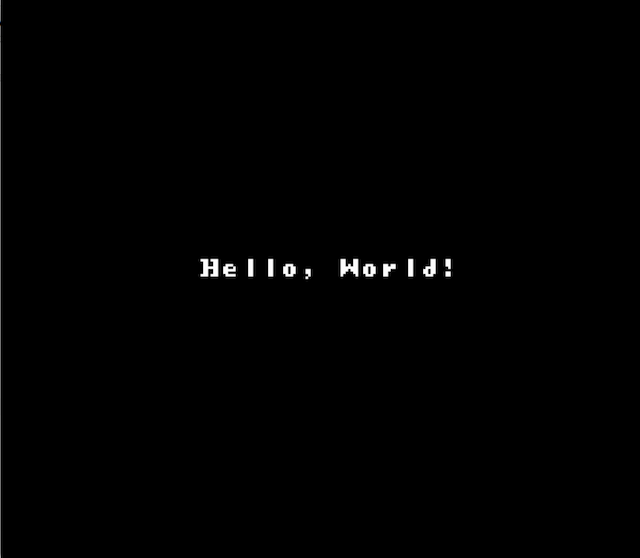
Our goal for this first lesson is to create the “Hello, World!” equivalent of an NES ROM. To see it in action, load the finished product in your NES emulator of choice. You should see something like this in all its glory:
It doesn’t seem like much, but just getting to this point requires a decent amount of knowledge of both how the NES hardware and our toolchain works.
The C Code
The best place to start is probably hello_world.c, where the code that actually produces our “Hello, World!” screen lives. You can find the full source for this lesson on Github.
The first thing you’ll notice is the list of #defines all beginning with PPU_:
#define PPU_CTRL    *((uint8_t*)0x2000)
#define PPU_MASK    *((uint8_t*)0x2001)
#define PPU_STATUS  *((uint8_t*)0x2002)
#define PPU_SCROLL  *((uint8_t*)0x2005)
#define PPU_ADDRESS *((uint8_t*)0x2006)
#define PPU_DATA    *((uint8_t*)0x2007)
These are aliases to specific memory addresses that are mapped to 8-bit registers in the PPU—the Picture Processing Unit, which generates the video signal sent to the TV—thus exposing them to code executed on the CPU. These registers allow us to communicate with the PPU and tell it what we want to appear on the screen.
Next, we have a few definitions for color values used to define palettes:
#define COLOR_BLACK 0x0f
#define COLOR_WHITE 0x20
The PPU is capable of a limited set of pre-defined colors which can be combined in palettes and assigned to sprites. Each color can be represented in a single byte, hence the term “8-bit graphics.”
Setting up our data
Next, we’re defining a few variables, but there are a few things to explain.
First, the #pragma bss-name is a pragma provided by cc65, the C compiler we’re using to target the 6502 CPU in the NES.
For this tutorial series, I will be using cc65 compiled from source from the master branch on Github (V2.15), which is newer than the version provided by package managers like homebrew.
As such, the tutorial code may not compile/link on older versions of cc65/ld65.
What the pragma does is allow us to specify where in memory we want variables to be defined.
We’ll get to where we define these memory areas in a bit, but first we’ll talk about how memory is laid out on the NES.
The NES CPU has 2 KiB of internal RAM, split into eight 256-byte pages, with each address represented as a two-byte (16-bit) word.
The first (or zero-th) page is called the zero page, as all of its addresses begin with the byte 0x00.
The 6502 instruction set has special instructions for dealing with zero page memory addressing that take into account the implicit zero byte and therefore run a little faster than the same instructions performed on memory in other pages.
Since we’re writing code for a 30-year-old piece of hardware that runs at a blazing 1.79 MHz, we’ll want to take advantage of the zero page for variables that are most often used in our game.
What’s used more often in a C program than a loop counter?
#pragma bss-name(push, "ZEROPAGE")
size_t i;
#pragma bss-name(pop)
Why, you may ask, are we defining this globally instead of using a local stack variable? Loop counters will be often used and we want to take advantage of the extra speed in using zero page memory (our C stack is not located in the zero page). A register would be ideal, but the CPU only has three of those and we want those available to the compiler.
Next up, we’re going to define (in plain old BSS set up in other pages of RAM), the rest of the data we need for this game.
const char TEXT[] = "Hello, World!";

const uint8_t PALETTE[] = {
    COLOR_BLACK,                           // background color
    COLOR_WHITE, COLOR_WHITE, COLOR_WHITE, // background palette 0
};
First is the text that we want to display on the screen. Simple enough.
Next, we’re going to define a palette to be used to render the background. Palette data has to be in a specific format expected by the PPU. Aside from a universal background color (we’re using black), we can define up to four different background palettes (we only need one), each with three colors (again, we only need one—white). Each 16px × 16px area of the background will be associated with a background palette and can make use of its three colors in addition to the background color. As we’re creating a very simple background and not using any sprites, we’re only worried about a single background palette.
Into the void
Now that we have all the data set up, let’s move on to our main():
void main(void) {One thing that may look out of place for C developers is the fact that main takes no arguments (we’re running directly on the hardware; there’s no OS/shell to pass in arguments) and returns no value (again, there’s nowhere to which we return).
Thanks to some startup code we’ve written elsewhere (we’ll get to it later), we can assume that memory, the PPU, etc. are in a known state by the time we get to main.
RAM is zeroed, all rendering, sound, and interrupts are disabled, and the PPU is ready to receive data.
The first thing we’ll do is send our palette data over to the PPU:
PPU_ADDRESS = 0x3f;
PPU_ADDRESS = 0x00;
for ( i = 0; i < sizeof(PALETTE); ++i ) {
    PPU_DATA = PALETTE[i];
}
To understand what’s going on here, we have to know that neither the CPU nor the PPU have direct access to each other’s memory.
When writing data to the PPU, we first have to tell it where in its memory (there are 2 KiB of VRAM in the PPU—though game cartridges could provide more—as well as a little memory for palettes and sprite data) we want to read or write data from.
This is done by writing first the upper followed by the lower byte of the target address to the PPU_ADDRESS register.
Palette data is stored to be in addresses 0x3f00 through 0x3f1f in PPU RAM.
We write one byte at a time to the PPU_DATA register.
Each read or write to this register increments the PPU_ADDRESS by one (this can be configured by a flag in PPU_CTRL that we’ve set up in our initialization code).
Now that the palette information is copied over to the PPU, we’ll move on to the background tiles that make up our “Hello, World!” greeting.
PPU_ADDRESS = 0x21;
PPU_ADDRESS = 0xca;
for ( i = 0; i < sizeof(TEXT); ++i ) {
    PPU_DATA = (uint8_t) TEXT[i];
}
Looking at the PPU memory map, you’ll see that the address we’re writing to is located in the 0x2000-0x23FF range designated for Nametable 0.
A nametable is a 1 KiB chunk of memory that represents the background.
There are four such nametables addressable by the PPU and we can switch between them using a flag in PPU_CTRL (our startup code initialized this to Nametable 0).
You may have noticed that there are four 1 KiB nametables but only 2 KiB of VRAM; two of them are just mirrors of the other two (whether mirroring is horizontal or vertical can be configured; we’ll look at this when we get to scrolling backgrounds) unless additional VRAM is provided on the cartridge.
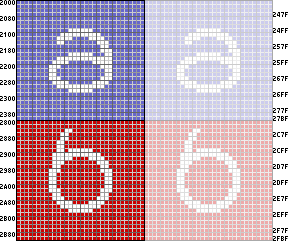 Horizontal mirroring.
Source: NES Dev Wiki
Horizontal mirroring.
Source: NES Dev Wiki
Each of the first 960 bytes in the nametable represent which 8px × 8px tile in the pattern table (we’ll talk about these soon) to display in that 8px × 8px area of the screen. The background is composed of 30 rows, each with 32 tiles. The remaining 64 bytes in the nametable make up the attribute table, which specifies which palettes are used for each 16px × 16px area of the screen.
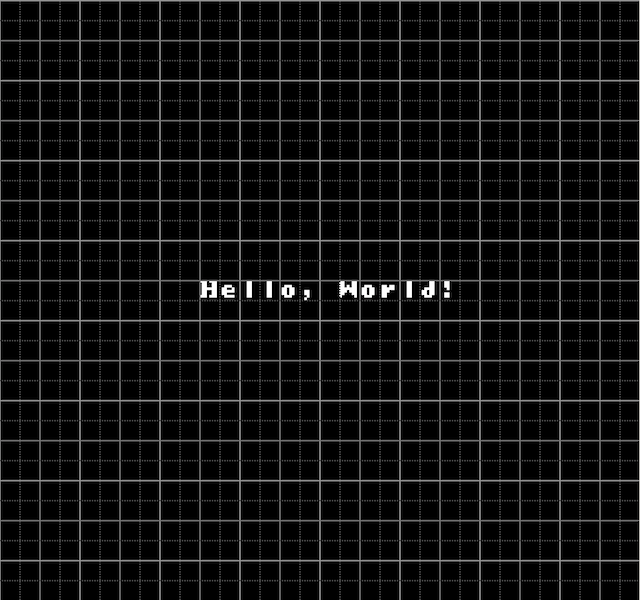 Our nametable after loading data into the PPU.
We can see both the 8x8 tile grid and the 16x16 attribute grid.
Our nametable after loading data into the PPU.
We can see both the 8x8 tile grid and the 16x16 attribute grid.
By writing to address 0x21ca, we’re writing into Nametable 0 with an offset of 0x1ca (the 458th tile, i.e. row 14 column 10), which will center our “Hello, World!” text on the screen.
What we are actually writing to PPU_DATA here one byte at a time are offsets into the pattern table, which we’ve conveniently created to store the tiles making up our font in offets corresponding to the ASCII value they represent (e.g. the tile representing the letter A is stored at offset 0x41).
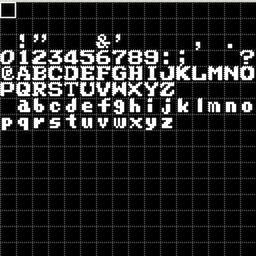 Our pattern table.
Notice that tile 0 is a blank tile, which makes up the majority of our background.
Our pattern table.
Notice that tile 0 is a blank tile, which makes up the majority of our background.
Before turning rendering back on, we have to tell the PPU which pixel of the nametable should be at the top-left corner of the screen.
This is done by writing first the horizontal offset followed by the vertical offset to the PPU_SCROLL register.
We want to start from the beginning of the nametable, so we’ll set both to zero.
PPU_SCROLL = 0x00;
PPU_SCROLL = 0x00;
Now it’s time to tell the PPU to start rendering. First, we’ll write the byte 0x80 to PPU_CTRL.
It’s easier to understand what’s going here if we look at that byte in it’s binary form: 0b10000000.
There’s actually a lot going on in this one byte; each of those bits has a purpose.
The relevant bits for now are that we’re telling the PPU to use Pattern Table 0 and Nametable 0.
PPU_CTRL = 0x80;
PPU_MASK = 0x1e;
The last thing we have to do is set the PPU mask.
We’re setting a value of 0x1e, or 0b00011110, which tells the PPU to render all backgrounds and sprites and to render them in color.
Our work being done, we command the CPU to spin forever as we bask in the glory of our creation.
while (1) {};Next Time
In the next post, “Hello, World!” Part 2, we’ll look at how we lay out memory addresses in our code, how to initialize the NES, and how to build all of our code into a complete ROM.