Learn to Make NES Games
Sprites and Input
What good is a video game unless we can actually play it? In this lesson, we’re going to cover capturing input from standard controllers and acting on that input every frame to move a sprite around the screen. Check out the finished product to see it in action.
Firstly, we’re going to need to add some new sprites to our pattern table.
A great tool for editing NES tilesets is YY-CHR which is a Windows program but runs decently in wine on Linux and OS X.
It comes in two flavors, the newer .NET version and the older C++ version.
I find that the .NET version is generally your best bet, though copy/paste seems to work better in the C++ version when running in wine.
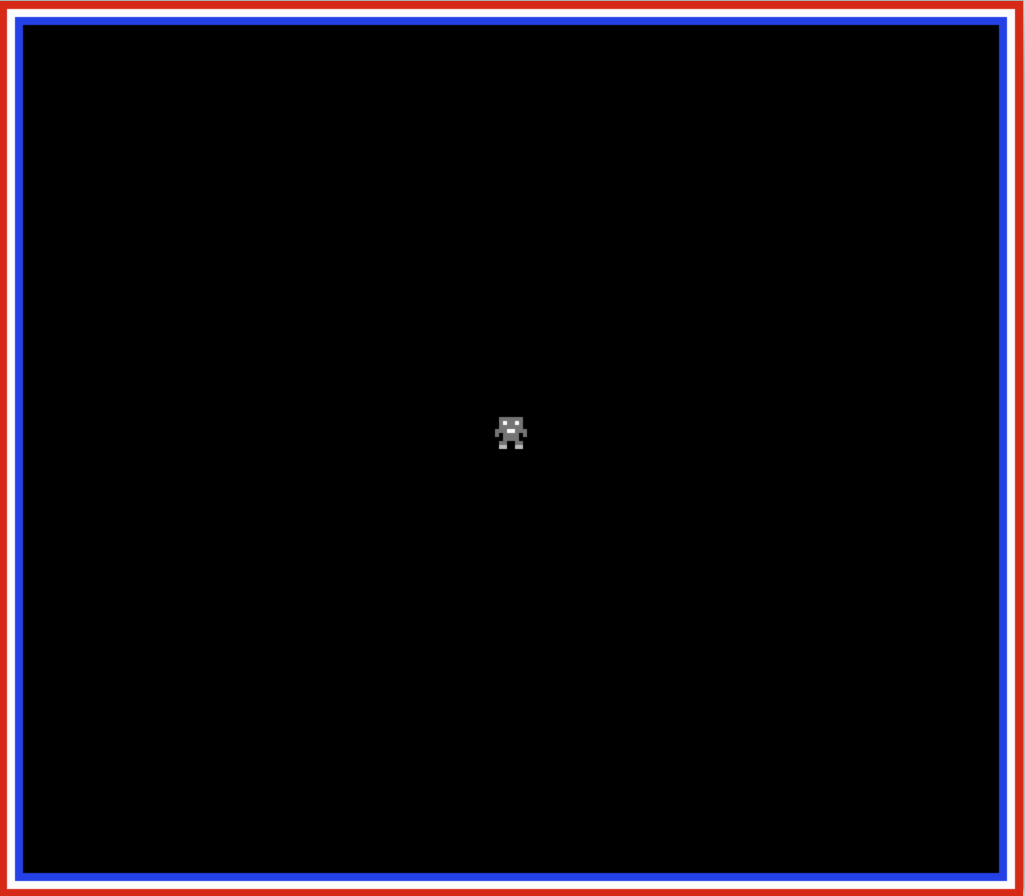
Let’s add some background tiles to make a border around the screen and a tiny one-tile character (we’ll get into using metasprites to make a multi-tile character in a later post).
Something Familiar
Remember how to draw background tiles to the pattern table? Let’s do that again. First, we’ll create some handy aliases for the tile indices representing our background (and the sprite that we’ll use later).
#define BLANK_TILE    0x00
#define BORDER_TL     0x01
#define BORDER_TR     0x02
#define BORDER_BL     0x11
#define BORDER_BR     0x12
#define BORDER_T      0x04
#define BORDER_B      0x14
#define BORDER_L      0x03
#define BORDER_R      0x13
#define SPRITE_PLAYER 0x10
We’ll also create a background palette (we’ll only need one for this lesson) that will color our border tiles and a sprite palette (again, we’ll just need one) to use for later.
After writing the palette data to the PPU, we’ll set the PPU_ADDRESS to the beginning of the nametable and then loop through and fill in our border tiles:
// draw top
PPU_DATA = BORDER_TL;
for(i = 0; i < (NUM_COLS - 2); ++i) {
    PPU_DATA = BORDER_T;
}
PPU_DATA = BORDER_TR;

// draw sides
for(i = 0; i < (NUM_ROWS - 2); ++i) {
    PPU_DATA = BORDER_L;
    for(j = 0; j < (NUM_COLS - 2); ++j) {
        PPU_DATA = BLANK_TILE;
    }
    PPU_DATA = BORDER_R;
}

// draw bottom
PPU_DATA = BORDER_BL;
for(i = 0; i < (NUM_COLS - 2); ++i) {
    PPU_DATA = BORDER_B;
}
PPU_DATA = BORDER_BR;
Since we’re only using one background palette, and it’s palette 0, we don’t have to do anything with the attribute table. Now let’s move on to something new!
That Shrewd and Knavish Sprite
Information about sprites on the NES is stored in a special 256-byte chunk of memory in the PPU called OAM, or Object Attribute Memory. Each sprite is represented by four bytes, which means that we can display up to 64 sprites on the screen. The PPU can only render eight sprites on the same scan line; those nearer the beginning of OAM taking precedence over those near the end.
We can write data to OAM very similarly to how we write to the rest of the PPU using the OAM_ADDRESS and OAM_DATA registers, but there’s actually a more efficient way to do it.
The NES actually has a DMA (Direct Memory Access) mechanism to write an entire page of RAM (256 bytes) directly into the PPU’s OAM much more quickly than we could looping through and writing one byte at a time into OAM_DATA.
If you remember from the introduction to vblank in the last post, we’re limited to writing to PPU memory (including OAM) during the (very, very short) vblank period, so we want to save as many cycles as we can.
Firstly, we’re going to set aside a page of RAM to be used as a buffer that we’ll write to OAM every frame:
MEMORY {
…
    OAM: start = $0200, size = $100;
…
}
…
SEGMENTS {
…
    OAM: load = OAM, type = bss, define = yes;
…
}
The define = yes for the OAM segment defines the linker symbol __OAM_LOAD__ (it will be 0x0200 corresponding to the start address we set for the memory section).
We can now very easily modify our NMI handler to write the buffer to OAM every frame via DMI.
We do this by setting OAM_ADDRESS to 0 (start writing to the beginning of OAM) and then writing the high byte of the RAM address (0x02 for 0x0200) to OAM_DMA:
; start OAM DMA
lda #0
sta OAM_ADDRESS
lda #>(__OAM_LOAD__)
sta OAM_DMA
Now we can update our buffer anytime we want and any changes will be pushed to the PPU during the next vblank.
To make our code more readable, we’ll define a struct to represent a sprite in our buffer:
// OAM sprite
typedef struct sprite {
    uint8_t y;          // y pixel coordinate
    uint8_t tile_index; // index into pattern table
    uint8_t attributes; // attribute flags
    uint8_t x;          // x pixel coordinate
} sprite_t;
And we’ll create just one sprite for our player at the beginning of our OAM buffer, then initialize it before enabling the PPU:
#pragma bss-name(push, "OAM")
sprite_t player;
#pragma bss-name(pop)

…

player.x = (MAX_X / 2) - (SPRITE_WIDTH / 2);
player.y = (MAX_Y / 2) - (SPRITE_HEIGHT / 2);
player.tile_index = SPRITE_PLAYER;
Now we have our player smack dab in the middle of the screen. Let’s make it move!
Pulling the Strings
We’ll want to poll the input from the controllers with every frame, but we want to make sure we’re not wasting valuable vblank time.
To achieve this, we’ll create a new method, WaitFrame that will spin idly until our NMI handler completes, then carry out some non-PPU tasks that we want to do every frame, like reading input, then yield back to our game loop:
_WaitFrame:
    inc frame_done
@loop:
    lda frame_done
    bne @loop

    jsr UpdateInput

    rts
We’ve written this in assembly because it’s super simple and we can loop more efficiently.
Notice the use of a new zero page variable, frame_done, which we won’t need to export to C as it’s only used internally.
A call to WaitFrame will set this flag to a non-zero value (via inc) then wait for it to be zero, which will happen at the end of our NMI handler:
; release _WaitFrame
lda #0
sta frame_done
As you can guess by the lack of a leading underscore, we’ll also write UpdateInput in assembly and won’t export it to C, though we will expose the values that we’ve read from the controllers.
Reading controller data
The code to read the controller values is fairly straightforward:
INPUT   = $4016 ; controller input (write)
INPUT_1 = $4016 ; input port 1 (read)
INPUT_2 = $4017 ; input port 2 (read)

…

; Read the states of both controllers to _InputPort1 and _InputPort2
ReadInput:
    ; strobe controllers
    ldx #$01
    stx INPUT
    dex ; x = $00
    stx INPUT

    ldy #08         ; loop over all 8 buttons
@loop:
    lda INPUT_1     ; read button state
    and #$03        ; mask lowest 2 bits
    cmp #$01        ; set carry bit to button state
    rol _InputPort1 ; rotate carry bit into button var
    lda INPUT_2     ; repeat for second controller
    and #$03
    cmp #$01
    rol _InputPort2

    dey
    bne @loop

    rts
First, we need to strobe the controller by writing a 1 followed by a 0 to a memory-mapped register at 0x4016.
Strobe is a term in electronics used to refer to a signal which helps synchronize the data in a bus when the components (here the CPU and the controller) have no common clock.
By writing 1 we’re telling the controller to start filling its internal shift register with button states.
We have to write a 0 before we start to read those states or else we’ll always be reading the state of the first button (the A button).
Each time we read from the controllers shift register (via the memory-mapped 0x4016 and 0x4017), we get the state of one button in the following order: A, B, Select, Start, Up, Down, Left, Right.
After reading a button state, we only care about the first two bits, so we’ll perform a logical and on the value read with the mask 0x03 (or 0b00000011).
The cmp instruction will set the carry flag to 1 if the button is pressed (i.e. the result of the and was 1) and 0 if it isn’t.
Finally, we rol (rotate left) the carry bit onto the _InputPortX variables.
After doing this eight times, we’ll end up with a byte for each controller port where each of the eight bits represent the state of a button on that controller.
All we need are some masks to be able to test for the states of individual buttons:
#define BUTTON_RIGHT  0x01
#define BUTTON_LEFT   0x02
#define BUTTON_DOWN   0x04
#define BUTTON_UP     0x08
#define BUTTON_START  0x10
#define BUTTON_SELECT 0x20
#define BUTTON_B      0x40
#define BUTTON_A      0x80
You’ll notice that UpdateInput actually calls ReadInput twice and compares the values from each read, returning only if they are equal.
This has to do with a conflict with the APU (Audio Processing Unit) that can sometimes interfere with reading the controller input on NTSC systems.
If we read the same values twice in a row, we can be reasonably sure that those are the correct values and no interference has occurred.
Now we’ll just export the necessary symbols:
.export _WaitFrame
.exportzp _FrameCount, _InputPort1, _InputPort1Prev, _InputPort2, _InputPort2Prev
And make them easily available in C:
extern uint8_t InputPort1;
#pragma zpsym("InputPort1");

…

void WaitFrame(void);
Acting on the input
Finally, we can make our sprite move every frame by updating its coordinates in our OAM buffer based on which buttons are currently pressed:
WaitFrame();

if (InputPort1 & BUTTON_UP) {
    if (player.y > MIN_Y + SPRITE_HEIGHT) {
        --player.y;
    }
}

if (InputPort1 & BUTTON_DOWN) {
    if (player.y < MAX_Y - (2 * SPRITE_HEIGHT)) {
        ++player.y;
    }
}

…
We left an 8px (SPRITE_HEIGHT) buffer so that we don’t overlap with the border that we drew in the background.
The coordinates are for the top-left corner of the sprite, so we have to take into account the height of the sprite itself in addition to the height of the border tile for the bottom boundary, hence the (2 * SPRITE_HEIGHT).
Now take a few minutes and enjoy commanding your character to explore the vast expanse of the screen.
Next Time
In the next post, we’ll look at more efficient ways to create and draw static (non-scrolling) backgrounds, using metasprites to represent multi-tile sprites, and animating our sprites.
Appendix: NTSC Overscan
While poking around nes.h, you might have noticed some funky stuff going on with NTSC vs. PAL.
Due to overscan, NES games played on an NTSC TV will often have the first and last eight pixels (which is also the first and last row in the nametable) hidden by the border of the TV.
Many emulators therefore will only render lines 8-231 when playing an NTSC ROM, so we’ll create some handy constants that take this all into account and make our loops (like those in DrawBackground) easier to write.